Followers

WELCOME

Welcome to the Order of the Opus Gluei!!!

New challenges every two weeks and open to YOUR interpretation - all art forms are welcome!

Come and play with us!

Sunday, December 12, 2010

Challenge #83 - If you made it, we will come.

This next couple of weeks, we are challenging you to share anything you have made. If you made it, we want to see it.   We want to get inspired (as we always do) by your creativity.

As you could see in our last challenge we had wonderful projects shared with us and you, so let's see what else you're making - If you make it, we will come -
especially if it's food. Yum!!! 

*****
Rosemary here and I had a wonderful time Making Merry with my friend Casii and new friend Kim.  There's more details over at my personal blog but suffice to say that this day of creating and sharing projects with one another is a new tradition that we're going to enjoy for years to come!

I demonstrated a project to embellish a plain, paper mache/chipboard type wine box suitable for festive gift giving!

From left to right - Casii's, Kim's and mine

A closeup of mine


Casii taught us how to make the most whimsical, retro/vintage marvelous dreamy clouds that carry the dreamer off to imaginative places!  You get to use vintage tins, photos, picks, and on and on!!!!  (again, more details at my blog)


Kim taught us that silk ribbon embroidery is not terribly complicated but a little easier than expected and quite fun!  My poinsettia isn't finished but seriously, I can do this!


Jana here: I made a couple of wreaths. I saw a really cute one made from Christmas bulbs, and thought, "Hmmm. I can do that." So I bought the wreath base, a couple of tubes of plastic bulbs and a roll of ribbon. Then I thought, "Hmmm. I should make one for my sister too." So I bought another wreath base and more bulbs and more ribbon. Cuz, can you really have too much ribbon?!?!?!?!
This one is for my sister. She LOVES the New Orleans Saints. She lives pretty close to the Big Easy, so I chose rich colors and a Fleur De Lis to adorn her wreath.


------

I was making this next one to keep, when my daughters suggested that their grandma would really like it. (My mom LOVES Christmas.) It isn't that my girls don't like the wreath, but rather that they are really pretty giving girls. For this I am thankful. They are really very regular about considering others. (And I do mean others. They will fight tooth and nail to keep from sharing with each other. SIGH. But with others, they are very generous.)
(Rosemary sneaking in here - Jana's girls are wonderful children, I love them bunches.  I would be hard pressed to give either of these fantastic wreaths away!  THESE ARE BEAUTIFUL, JANA)


I have a confession to make. I didn't use any glue. These wreaths were made without adhesives of any kind.
Seems odd since our name implies that we glue everything.
Just thought you should know.

-----

Now it's your turn to WOW us with your creations!!!


Sunday, November 28, 2010

Challenge #82 - Let's get Frosted

This week we're Getting Frosted.
Actually we are extending this challenge for 2 weeks.
So you can get Frosted if you want to and then still have time to create something with a Frosted theme.

With the Holidays upon us, we figure that just like us, you need more time to do things.  (perhaps LOTS more time)

So we are going to alter our schedule for the next few challenges to a 2-week per challenge deadline.
(whew, more opportunity to play with us!)

We'll resume our normal weekly challenges on January 9th.

In the next 2 weeks we'd like to see Frosted things.
You know, snowmen, snowflakes, snow bunnies, snow scene, you at the office Holiday party (wearing a snowflake lampshade would be awesome)... you get the idea. (Kinda felt like Forest Gump's buddy there for a second. LOL)

******
Ice Princess Poobah Rosemary here and I have a FROSTY Christmas card to share with you in icy shades of blue and white.  (honest, I wasn't drinking frosty adult beverages while making this - although it appears crooked and isn't in real life)

Used my Inkadinkado/Brenda Walton stamp set and stamped the kids on the sled in Distress Ink - Broken China, embossed with iridescent powder for an icy look.  The background is a Cuttlebug embossing folder of snowflakes that I used Versamark Frost ink to give it a sheen and then more of the Broken China Distress Ink.  A little icy blue ribbon, punched, inked and pop-dotted snowflakes for more visual interest and texture with random bits of bling (rhinestone, pearl, and silver) in the centers of some snowflakes.  Also, you aren't seeing things  - Gertie the Birdy happened by to provide encouragement!

**************

Ice Princess Poobah Jana will be by shortly after she's gotten Frosted

Ice Princess here: I finally got the time to finish my feeble little Frosted cards and tags. I made some Christmas cards, because I needed them AND I made some gift tags.


I made a bakers dozen of these cute little tags.
I still need to add stick arms, but wanted to get them up here for you.

*****
Until then, let's see what you create when you
GET FROSTED!!!!

Add your FROSTED project to our Linky Blog Hop:

Sunday, November 21, 2010

Challenge # 81 - Color

The challenge this week is to use COLOR.
Specific colors that is.

Use these colors in your project this week:


*****
Jana here:  Rosemary and I have discussed the challenges for over a year now. We talk about them and agree on the subject for each week. Well, this one was no different. We discussed it. She emailed a color palette to me. I agreed that the colors are gorgeous, and that some beautiful projects would result from the color combo above. Then I came home and started my project. I went through several projects but couldn't decide. So I just started making the background paper. A technique from Tim Holtz's book. I picked out the colors that I thought I remembered from the color swatch above. As you can see, I missed the mark. But only by a little. I got the green, and the cranberry and the orange. But where in the world did I get the purple????? Ah, well. Here's one of a set of four cards that I made.


I mounted the background directly onto the card. I really love the way the colors POP against the black. I added a piece of white cardstock on the inside to write the message. Although, I could just use a white pen. All four cards turned out differently and I have the others posted on my blog here if you are interested.  

I hope you do better than I did in remembering the colors.

*****

Join us in our color adventure this week. Won't you?


Sunday, November 14, 2010

Challenge #80 - Men Men Men Men Manly Men

We love them, they make us crazy. 
They are simple but complex, funny and moody,
lovable and maddening.
They are our dads, brothers, husbands, boyfriends, teachers, partners, co-workers, bosses, helpers, and so on. 

They comprise half the population (or thereabouts)

They are the male species, that's right,
MEN

Your challenge this week is to create a project with the theme of men.

Might be for one, might be about one.  The choice is entirely yours!

*****

Rosemary here - Okay, I was originally quite stumped about what to make for this theme.  I don't have any male relatives with birthdays in the near future (and I do my best work under pressure), and then it was Veterans' day and I immediately thought of my Dad.

So, here's my first project, a layout for my Dad.
It's simple because he never liked frou-frou for men.
Never thought a man should wear more than a watch (unless it was something dressy)
Besides, he's so handsome he didn't need further embellishing.

I am honoring his military service and I put a little personal journaling in a pocket behind the photos.  You can read it on my blog (because I'm that way too, I want to read what the journaling says, for Pete's sake)

My photography is atrocious but love me anyway. (please)


My second project is not serious at all, just something funny I pulled together. I love Anne Taintor's sassy work, pairing photos and ads with witty sayings.  This is my substandard attempt to do the same.  (Forgive me, Uncle Jus and Aunt Betty)


*****

Jana here: I have used up my supply of manly birthday cards, and used this challenge as an opportunity to replenish my stash. (Well, 2 cards IS a start to replenishment anyway.)

First up is one that I made during a stamping club meeting.


And here is the inside of the card.

All of the supplies used are Stampin' Up. Pictures are not the best, but you get the idea.

Second on deck is one I designed using mostly Tim Holtz's goodies. (Yup, I am smitten with this Man. My DH has no worries of me running off with him though. He's taken. LOL)


This one was made to enter into another challenge too.
For details, go to my blog HERE.

*****


So?  Are you inspired?  How about now?
Maybe NOW?

Okay, then get cracking and start inspiring us with YOUR creations!

Thursday, November 11, 2010

We have a WINNER folks... Scroll down for the current challenge.

I know it's a bit late in announcing, but the hopefully the winner won't mind.

Last week's Challenge of Trick Or Treat included a drawing for a Tim Holtz Configurations Box.

I used the random number generator to decide the winner. (Because I am wimpy that way.)


And the WINNER is ...


ELECTRA

I'll get that out in the mail to you in the next week. I'll send you an email to let you know it's coming. Thank you SO MUCH for playing with us.

Sunday, November 7, 2010

Challenge #79 - An Attitude of Gratitude (THANKS)

TODAY is Jana's Birthday - she's officially 21 and I'm so glad she is because now I can finally take her out to grownup places to celebrate!

Leave her a lovely message of birthday love, ok?

THANKS

*****
Now, onto our challenge for this week.

Do you have an attitude of gratitude?  Are you thankful for the little and large blessings in your life?

How do you express gratitude, thanks, appreciation?

Here in the U.S., we are going to soon be celebrating Thanksgiving, 
to thank God for the bountiful blessings in our lives

That seemed like a good theme for Opus Gluei - Thanks

Thank you for reading our blog
Thank you for participating in our challenges
Thank you for inspiring us with your projects
Thanks for the kind words you give to us
Thank you, God, for a great friend like Jana (and she's a pretty fantastic Poobah to boot)
Thankful for Rosemary. She's a very good friend. And a wonderful person and Poobah too. 

********
Rosemary - Okay, so here I am with another banner project.  This one reads "Give Thanks" and it's gracing my front door as we speak so that the UPS and FedEx guys have something to look at when they drop off goody boxes.  It was easy, it's colorful, and definitely has a feel of the season. 


******
Look out, here's the Birthday Girl!!!
Jana here: Rosemary is too sweet. Yes, it's my B-day. And I am now old enough to order drinks in public now. LOL. Anyway, onto this week's gratitude. I have been inundated with those pesky kids of mine. Somehow, they think that because it's my birthday that I have to spend ALL of my time with them. Watching movies, being served meals, snacks and drinks by them, and just hanging out. They really are a bit put out because I am taking time to post this card I managed to squeeze in this morning. It's really kind of sweet. I am so very grateful that they still want to hang with their old mama. Very, very grateful.


For the details go to my BLOG here.
******
Now, let's see YOUR take on this theme of Thanksgiving, thanks, appreciation, gratitude!

Sunday, October 31, 2010

Challenge #78 - Trick or Treat, smell our feet...(UPDATED)

......well, not really smell our feet. But that IS how the little saying goes.

The TRICK is to incorporate a TREAT in your project.

The TREAT is that one of you will win a fabulous prize.
More on that later....

For now, go forth and create a sweet project worthy of ooooh's and aaahhh's.

Inchies, twinchies, ATC's, cards, jewelry, or something edible, it's up to you.


********

Jana here: I love Halloween and all the wonderful candy that my girls bring home we give out to those adorable little trick-or-treaters on this night.

My project is a pretty simple one. It had to be. I was out of town for a week. Then DH was out of town for a week. And then there is (was) the Halloween Sleepover Party. Yikes. Talk about spooky!!! Anyway, I made these two ATC's to pay tribute to my love of all things sweet on Halloween.


One of these little guys will be included in the grand prize TREAT package.
Interested yet??? You will be in a minute.

***

Rosemary here (just under the wire) and here's my TREAT - I finished my autumn wreath comprised of handmade paper roses

More details on my personal blog


*****

Now for the TREAT for one of you lucky creators...

Along with one of my treasured works of art (ROFL), you'll get one of these:


Yup, that's right. I have a TIM HOLTZ Idea-ology CONFIGURATIONS 6.75" X 8.75" Shadow Box for your creative pleasure.
Can you just imagine the possibilities of this?

Tim has decorated a couple of them on his blog.
One for Halloween and one in a Christmas theme.
And there may be a few other little goodies thrown in, but seriously, do you really think they compare to this?!?!?!

Well, what are you waiting for? Get going. Create a TREAT for us to oogle over.

******

Just add the link to your project post here:


Sunday, October 24, 2010

Challenge #77 - Have a cuppa

Mmmmm...a nice warm cuppa

tea, coffee, cocoa, hot toddy, whatever

(even a cuppa kindness will suffice)


What does this theme conjure in your mind?


Your challenge this week is to create based on


CUPPA


Have a nice cuppa something tasty and think about it and then get crafty, creative, artsy about it!

****

Jana here: Freakishly enough, Rosemary and I had the same idea for our cards. But with a slightly different twist. Mine is Halloween themed. (Surprise!!!)


The middle of the flower is a SU stamped mug that I colored black and then cut out with my Exacto.

****

Rosemary here - back from vacation and I couldn't wait to go and play in my room!  I started looking for my favorite coffee stamps and I couldn't find them.  Apparently they have taken a coffee break.  But that's okay, sometimes you have to go to Plan B.  I did find my Coffee and Tea QuicKutz die set.  I don't use my dies nearly as much as I used to and that's a shame because you can make some cute stuff with them, fairly quickly too.

Here's a quick card that I think is pretty cute to send to a friend as an invite to
have a good long chat over a cup of coffee or tea. 

I liked the dark brown background (reminiscent of a good cuppa) and then found some patterned paper and cardstock to match up.  The tea tag was in the die cut set and just needed a little embroidery floss to give it some oomph.


My other project is a canvas one and I needed more time, so I'll probably upload it in the next day or two!
(This is like those tv shows where you wait the whole hour only to see "to be continued", but I think it will be fun and worth it to check back)

See?  It's coffee colored to start with.


*****

Add your CUPPA right here. And don't be shy, add to your blog and join in on the BLOG HOP.

Sunday, October 17, 2010

Challenge # 76 - Woodn't it be loverly... (Electra be warned - spider alert!)

Woodn't it be loverly... ??? You can put whatever ending you like here. And, NO, I didn't mis-spell the word. The challenge this week is to use wood as your inspiration. Not paper, although it does come from wood, but real wood, be it alive (in the form of a tree) or dead (as in a piece of wood).


WOOD


*****


Jana here: I used a wooden shadow box that I found at the dollar tree. Yes, the dollar tree. I picked one up a couple of months ago and am now kicking myself for only getting one. Darn those little voices of logic in my head.


Anyway, I painted it black and filled it with all sorts of Halloween-ish things.


I've listed details about the contents on my blog HERE.


Woodn't you like to play along with us this week???


(Just because I am a bit obsessed with Halloween doesn't mean that your project has to be Halloween.


We welcome any and all projects.)


Grab the code and join in on the blog hop.


Sunday, October 10, 2010

Challenge #75 - Boil, Bubble, Toil and Trouble

Hello everybody!

Title sounds spooky doesn't it? Good!

Well, we are asking you to create using a recipe. bwahahahahaha

Our recipe!

It's not too complicated

Just make sure you have

1 Circle
3 Triangles
1 Half Circle
Embellishment

Hmmm....what could you make with that?????
(The nice part is that you don't have to cook it or anything...just create!)

***
Rosemary here and I challenged myself to make something inspired by this project from last year.

Made this way more difficult than I had to, but I used my Cricut Wild Card cartridge and then pieced the insert using scraps of patterned paper. The leaf is from embossed (Cuttlebug swirls folder) paper that I hand cut. One is a bit more fun.

While the other is feeling more elegant - all done in cream/gold embossed/patterned papers (with a blingy stem)

***

Jana here: I have requested, and granted to myself, an extra day or two. It's great to be a POOBAH!!

See you here in a couple of days.............


*****
We hope you visit fellow participants' blogs in these challenges. Not only will you see great projects that they submit HERE but you should check out their other posts and be inspired by their creativity! There are so many great blogs and cool ideas out there - you have to (in Jana's words) go blurfing!
.
.
Don't forget that you can add the BLOG HOP code to your post and party with us all week long.
It's your turn now!

Sunday, October 3, 2010

Challenge # 74 - HALLOWEEN

HALLOWEEN


Yup, our challenge is HALLOWEEN.


Make something, anything, that has to do with HALLOWEEN.


It's that simple.


Have fun with it.


***


Rosemary here and I have been having a banner year! Okay, 2010 has had its ups and downs but I've made quite a few banners (mostly birthday ones) so this is my first Happy Halloween one.

Pretty easy to do with a DCWV Halloween stack from the past, a small box of K&Co. Halloween chipboard, some cardstock, a Cricut, and several cartridges (Schoolbook Plantin, Celebrations, and Tags, Bags, and whatever else the box reads) (After that lengthy list you are probably thinking - that's a pretty easy to do, seriously? Yes, seriously, sounds tougher than it is and I think the results are great)


Here's a snippet with a closer view of the pennant pieces

I even had time for a second project; little treat bags for my nieces and nephews. I don't live near any of them so I have to content myself by looking at their Halloween costumes in photos rather than in person. But that doesn't mean I can't give them some goodies.


Last, but not least, are my Halloween rosettes. I recently purchased a Martha Stewart score board and boy, how I love it. It makes folds crisper than my bone folder alone and that makes putting together things, like the bags above, so much easier.

For my rosettes I simply cut pieces of 12" patterned paper about 1-1/2" wide and then used the handy-dandy lines and a bone folder to score the paper. Zigzag the folds, make sure you have even peaks and valleys, glue the strip into a circle and gently press down to make a rosette. Glue a circle to front and back for stability and be patient to let them dry. Add glitter to the rosettes (and yourself in the process) and then be patient again to let them dry.


What will I use them for? Well, I'm considering adding a few to the Halloween banner and then maybe even putting on fishing line and adding them to a door wreath.

Anyway, I hope you try this challenge theme out!


***

Jana here: BOY did I have fun with this one. First off, I kind of cheated. I am participating in a HALLOWEEN inchie swap on SWAP-BOT, so I made some inchies. Well.... I really love HALLOWEEN, so I decided that I couldn't just send 10. I mean, it's HALLOWEEN. SO I made 13. THEN, I decided that I wanted to send them in a special little container, so I got one of those cute little gift card tins you see at the check out counter in Mickey's. This one has white and orange stripes. How cute! THEN, I decided that the tin couldn't go "naked", and so I decorated it.


*

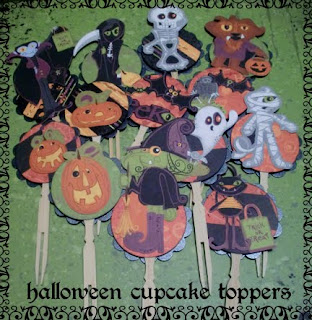
Next up is these Cupcake Toppers. Yup, another Swap-Bot swap. I have seen these adorable little cupcake toppers, so I joined a swap and thought that I would just make a set of 12 matching ones. BUT, that didn't quite happen. I recently re-found some adorable little shapes from a couple/few years ago and used them to make 13 (did I mention that it's HALLOWEEN???) of them.


*

My last HALLOWEEN swap is for a Matchbox. I love making them. They are small, so it's almost an instant gratification. And we ALL love that. I have spread out the contents in another picture on my blog HERE. There's also a glimpse of the "surprise" inside the matchbox. Bwahahahahaha.


*

And for myself and my family, I also made a Creepy Specimin display. Fashioned after the famous Ali's Butterflies. I have this hanging in the entry way of the house. Usually I have Butterflies here, so It'll be really creepy to folks that come over frequently. Mostly the girls' friends. BWAHAHAHAHA


A thousand apologies for the terrible photography. I could not, for the life of me, get a good shot of these little pests. I do have a couple of other shot of this, and another piece that I have, over on my blog HERE.
*****


Join us this week and share your HALLOWEEN creations.


Sunday, September 26, 2010

Challenge #73 - Feeling kind of Sketchy

Hello everyone! Thanks for participating in last week's challenge. We loved how you EASE(L)'ed into Fall!!!

This week we're "Feeling Kind of Sketchy" and to Opus Gluei that means a sketch challenge. Be inspired by the sketch below and let's see where your creativity takes you!


Feel free to use your imagination with the sketch.


***
Rosemary here and my project is a Halloween card on the gentle side.  I like that this has a vintage feel to it with the sweet witch image. (Stampin' Up's Greeting Card Kids set)
(other items used - DCWV Haunting paper, Mega circle punch, Copic markers, TwinkLets Diamond Dust glitter, buttons, thread, glue dots)


Jana here: When we here at OPUS GLUEI say to use your imagination with the sketch, we MEAN it. It's just how WE are, so, we have to extend our methods to you. You see, I had this wonderful mental image of the project I wanted to do with this sketch. What actually turned out, is only sorta close. You know how it is, you get going and things aren't quite how you imagined, so you make a little change. And then you have to make another change to accomodate for the other one, and so on and so on...... That's what happened here:


I had planned on using the HALLOWEEN as the sentiment and I had these cute little wooden pieces that were going on either end of the word. But they didn't fit. Physically or visually. So, they got tossed.


(No, not in the trash. Just to the scrap tin. Which sounds like they got tossed in the trash.


No little wooden pieces were harmed during the making of this canvas. I promise.)


If you tilt your head, and squint your eyes, and sort of cross them, you can see the sketch in here.


Sorta. Kinda. Can't cha?


I have further details about how I did this on my blog HERE.


***

Please join us in this week's Sketch challenge.
And feel free to add the BLOG HOP to your blog.

Thank you for playing along.

Go by and visit all these wonderful artists. And make sure that you check out the rest of their blogs too. They will surely WOW you.


Sunday, September 19, 2010

Challenge #72 - Ease(l) into Fall

Let's make this an easy transition and EASE{L} into Autumn.

I love Fall. The colors are rich and comforting. The sweaters are warm and cozy. But most of all I love Fall for daylight savings time. It seems to make the transition SO much easier. An extra hour (or so it seems) to sleep in.

So for this challenge, we decided to EASE (L) into Fall.

(As ALWAYS we are VERY LIBERAL with the interpretaion of our challenges, so use your imaginations and show us what you come up with.)
*****
Jana here: I have a couple of these little canvas/easel sets. So I decided to make a little piece of happy art for my Studio. I used watercolor crayons for the sky and the ground. Even though I covered up most of the ground. I gave it a good coat of workable fixative, cuz at that point I wasn't sure where I was going with this piece. I pulled out a tin of leftover images and went to town with them. Then I placed the floral chipboard down. Stuck the "laugh" and "love" and the red diamond shape with glue dots. I used three layers of foam mounting tape for the sandpiper. Glue dots for the "be happy" and for the flowers under the shells. And that "red" sticky tape for the shells.

The components were things I had lying around. Even the sandpiper was leftover from another project. Chipboard pieces even had sticky on the backs already. I have a couple more shots of this little guy on my blog, here.


*****


Rosemary here and here are my projects for this challenge. There are a bunch of great tutorials out on the Internet, so I recommend you do a quick search (if you need info on how to make an easel card) and take a look and be inspired by all that you find.


I used the same cardstock to form the base for both of my cards but then branched out and made a Halloween card and a Thanksgiving card.


Here's the card as its intended when the recipient opens it, the buttons help to keep it standing straight.


Here's the card held flat as it would be in the envelope.


My intention for my Thanksgiving cards is to make one for each person and use them as both a card and a placecard for Thanksgiving dinner.


Again, this is the open card


I used buttons as in the Halloween card but you can use just about anything (brad, eyelet, the mat around the bottom portion, whatever, endless possibilities).


Here is the card from the side to give you an idea of the easel card construction that I used.


*****
Join us this week by EASEing into Fall with us.